Monday, September 22, 2014

My fish had a "case of the Mondays......."

Happy Monday! Since this is a 3-day work week for most school districts, today is basically Wednesday in my book!

This weekend, I learned how hard it is to keep a goldfish alive. Its so, so, so much harder than you think. If you are like me, you figured you could pick up a couple fish at the pet store, give them cute names, throw them in a bowl and feed them once a day for the next 3-5 years. WRONG. 

If you are thinking about getting goldfish, read this first! I certainly wish I did....... Poor Taco made it about a week before going belly-up. 

http://thegoldfishtank.com/goldfish-care-take-care-of-goldfish/


In other news, I kicked off the autumn season today with a fun activity that I was able to use with students in grades 2-5. By just enlarging the number you assign to your students, this activity can be used at any elementary grade level! My students reviewed standard, expanded and word forms of a number and colored in the candy corn when they were finished. It made for a perfect, festive bulletin board! Enjoy!


-Miss I. 


Thursday, September 18, 2014

Place Value Freebie!

Happy Thursday!

We're all in full swing and nearing the end of our second full week of school! Mine was interrupted by a severe sinus infection which always hits me at back-to-school time! 

As a Basic Skills Math teacher, the first chapter we are working on in each grade level is usually related to place value. Below, you will find a freebie that will help your students build number sense and place value understanding. Apologies for the short-and-sweet post...it's tea and bed time for this sick girl!

Enjoy!


-Miss I


Wednesday, September 10, 2014

"Kitchen Sink" Muffins!

   I love muffins. I used to start my day with a crumbly corn muffin or moist gooey blueberry muffin from my favorite coffee chain until I realized that even the 'low-fat' version contained over 400 calories. Although I'm certainly not a calorie counter or health nut, I do try to eat well and can't justify that kind of caloric intake for a silly little muffin. Last night I had some too-ripe bananas lying around and decided to experiment with whatever I had in my pantry. My options were limited, but with a little tweaking and substituting, I ended up with a delicious batch of muffins! My egg yolk allergy (sad.....we all know the yolk is the essence of the egg!) caused me to substitute egg whites, but you could use either.


"Kitchen Sink" muffins

Makes 12-15 muffins.

1 ½ cups whole wheat flour
1 cup rolled oats
½ cup white sugar
2 teaspoons baking powder
1 teaspoon baking soda
½ teaspoon salt
¼ cup egg whites or 1 egg
¾ cup skim milk
1/3 cup applesauce
3 tablespoons peanut butter (optional)
¼ cup semi sweet chocolate chips (optional)
2 mashed bananas

Preheat oven to 350.

Combine flour, oats, sugar, baking powder, baking soda, and salt in a bowl.
In a separate bowl combine egg whites, milk, applesauce, and peanut butter. Add mashed bananas and combine thoroughly.
Stir the flour mixture into the banana mixture until it is just combined. Add chocolate chips or sprinkle them on top of muffins when they are in the pan.


Scoop mixture ¾ of the way full into muffin tins lined with cupcake liners or sprayed with oil. Bake for about 15 minutes or until edges are golden brown. Enjoy!


Here's the best part! If this recipe makes 14 servings that brings you to 157 calories a muffin! Sounds pretty guilt-free to me!


Friday, August 29, 2014

The Best Artwork You'll Never Buy!

    I love greeting cards. I have spent countless dollars and hours finding perfect cards to send to friends and family for different occasions. Although Papyrus is usually my go-to, I've been finding a lot of other great cards as I've explored new paperies in recent months. 

    Not only do I love to buy and send cards, but what's better than opening your mailbox and getting some good ol' snail mail? I have hundreds of cards that  I've saved throughout the years, mostly for sentimental reasons. My friends know I appreciate an adorable, sparkly card and it's nice to know they now give a lot of thought to the card buying process too! 

   I'm not big on the large pieces of artwork with popular quotes that are very common these days, but I've taken some of my favorite cards that have great quotes and graphics and framed them around my condo. I have gotten tons of complements on them! My favorite is a Wizard of Oz housewarming card (which also happened to be my favorite movie growing up!) 

   Next time you're at the store, find some great cards and toss them in a cheap frame backed with some scrapbook paper!  Great (and unique) artwork for under $5. 


Thursday, August 28, 2014

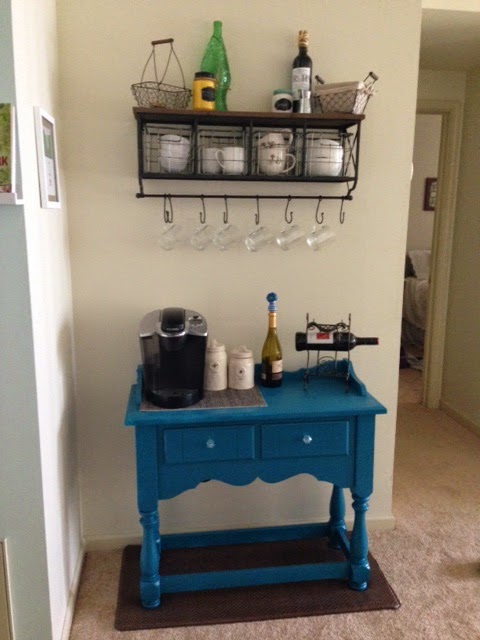
Coffee + Wine = Love

     I spent hours on pinterest when I first moved into my condo a few months ago. Since I don't see this as my 'forever' home, I didn't want to spend a fortune on furniture and decor. I see this as a little space that I can truly make my own. 

     I love putting things together that don't always match, but work together. I look for inspiration online and find ways to create things on my own or on a budget. I often do weekly rounds at my local Home Goods, Marshalls and TJ Maxx. It's hard to go to these stores looking for something super specific, but I've had a ton of luck this summer in finding exactly what I was looking for!


     One thing I was certain I wanted in my new little space was a coffee and wine "bar." I love a good cup of coffee, tea, or red wine! I scoured Pinterest and found so many great ideas. I came across this awesome shelf from Hobby Lobby. I procrastinated buying it and it quickly sold out online. Luckily, a Hobby Lobby recently opened nearby and I picked it up in July!


      My family has finally come to terms with my love for other peoples' junk, and my Aunt grabbed a great piece of furniture for me off of a curb on garbage day! After a date with a screwdriver, several coats of bright paint and some new knobs, my little coffee and wine bar came together wonderfully. 


Furniture- found on a curb!
Shelf and wire baskets- Hobby Lobby 
Glass mugs- Ikea
Lace bowls and mugs, rubber mat- Christmas Tree Shop 
Tea and sugar ceramic canisters- Home Goods 
Wine bottle holder- thrift store

Back to School Freebie!!


     It's that time of year again! Back to school! I still love to go back to school shopping. There's nothing better than new notebooks, binders, highlighters, markers, crayons, etc.- sometimes I even pick up a few things for my students ;). 

   Although next week begins the 'official' start of the school year in my district, every teacher I know has been working hard to get their classroom ready for the big day. The end of the summer is quite bittersweet. I know I don't speak for myself when I say that I spent my entire summer working several other jobs, but I am excited to get back into the classroom and back to a normal routine. 


   I spent my summer doing the million other projects that I don't always have time for during the school year. Aside from decorating and furnishing my new condo, I've taken on a new hobby: calligraphy! I will share more of my home and paper projects soon. Today's focus is all about school!


   Each year I try to choose a fun and exciting classroom theme. Last year, my classroom was decked out in cupcakes and baked goods! The students loved it, but I have to admit that I tired of it quickly since I often spend my weekends surrounded by baked goods (we will also discuss that at a later time...). Last year, I created these fun baked-good themed number posters. They include tens frames, which we know play an integral part in our Common Core Curriculum. Although they won't be hanging in my classroom this year, I hope you will enjoy them in yours!


 Number Posters Freebie!


    In the next few days I will be posting photos of my nice clean classroom and new math bulletin boards. Enjoy the holiday weekend!


Wednesday, May 14, 2014

My First Foray into Furniture Refinishing (Say that three times fast...)

The best thing about living on your own without a roommate or significant other is that you can decorate however you want and nobody can have an opinion about it (or that opinion won't matter). Does that mean you should have Ninja Turtles sheets on your bed as a 30 year old male? Probably not...but it's important for your space to reflect who you truly are (while still being a grown-up!). In the small space that I now own, I want to make sure each and every furniture and design decision I make is meaningful and fantastic. 

 My current obsessions are: thrift store furniture, the color aqua, and fabrics with bird print (save that thought for a later date).

I think vintage furniture is amazing. Don't get me wrong- I've purchased many a dresser at Ikea and they have served me well. However, there's something special about the detail, lines, and especially the quality of older furniture. 

With limited storage in my new space, I knew I wanted a multi-functional media stand in my living room and I knew exactly what I was looking for. I ventured over to the Morris Habitat Restore which happened to be having an anniversary sale. For just a little over $60, I picked up an amazing dresser that was sturdy and in great shape. I'm always amazed when I see people who take severely damaged furniture and rehab it, but as a novice I'm not quite there yet. 

After a ton of research and several trips to the hardware store, I decided to use the following products:

Zinsser Cover Stain Primer
Glidden Paint in Arctic Stone (2 sample jars were enough for the entire project)
Elmer's wood filler 
A good-quality Purdy paintbrush
Minwax Finishing Paste
Foam brushes
Painter's Tape
Cheesecloth or a very thin cotton rag/old t-shirt

As you can see, the dresser was in such great shape that I could've easily shined up the hardware and called it a day. But what would be the fun in that? 
Before:


Step 1: I removed all of the hardware and drawers.  I knew I was going to use different hardware, so I used wood filler to fill in the holes and sanded them down. It may have been an unnecessary step, but I taped around the inside of each drawer opening so I would have neater lines when painting. 

Step 2: I applied 2-3 coats of Zinsser Cover Stain Primer using a foam brush. Because it is oil based, it is best to use brushes that you are comfortable throwing away shortly thereafter. 

Step 3: I used a good-quality paintbrush and painted several coats of the Glidden Arctic Stone paint onto the dresser and drawers. After allowing it to dry overnight, I placed a ball of Minwax Finishing Paste inside of an old thin rag and waxed each part of the dresser. As you rub, the wax will seep through the cloth and give you a nice solid finish. Once it sets after about 15-20 minutes, you can wipe it down again with a clean cloth. 

Step 4: I placed the drawers back in drilled holes for the new hardware (apologies for the messy picture!)


Final Product:
As you can see, I removed the top drawer and drilled a hole in the back so my TV components fit perfectly inside. At some point, I may remove the drawer front from the top drawer and add a hinge and magnet to it so I can easily close it and keep those components hidden. For now, this works beautifully!


Total cost: Around $120 for dresser & supplies

Tuesday, May 13, 2014

Getting Down to the Core...

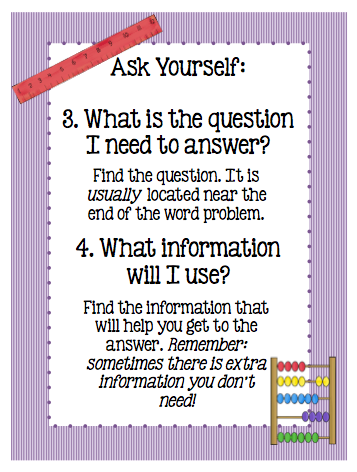
Love it or hate it, the Common Core is here to stay. The topic of the recently-implemented Common Core State Standards has become a national conversation (debate, argument, war, etc.....) most recently joined by my favorite comedian, Louis C.K. Regardless of my opinion on the subject, I work hard to create supplemental materials, anchor charts, and fun activities to support the CCSS. As a Basic Skills Math Teacher, I support, review, and reinforce the curriculum that my students are learning in the classroom while identifying weaknesses and strengthening their foundational math skills. As we work our way through the Common Core, one type of question seems to be especially dreaded by both students and parents alike. Constructed Response questions do not only ask students for an answer that often involves several steps and operations, but requires the student to explain his or her answer in words. I once asked a first grader to explain his answer by writing a sentence, and he drew a happy face. 

At least he didn't draw a sad face. 

As part of a school-wide initiative, I created a set of problem-solving steps that outline the thought process that a student should go through while solving a word problem. Although these steps may seem obvious, I always try to find a way to break down each process for my students into the smallest of steps. These 8 x 11 mini posters also include a problem solving checklist and operations clue word note page. I keep them posted directly next to my whiteboard so I can reference them each time we are working on problem-solving skills. 


Click the photos below to download!


To further educate yourself on the Common Core, you may visit http://www.corestandards.org/
Please visit my Teachers Pay Teachers Store!  A Piece of the Pi

A Piece of Miss I.

As a newbie to the world of blogging, how might I introduce myself? By day, I am Miss I., a Basic Skills Math teacher for children in grades K-5. By night, I am a budding cake artist, self-proclaimed foodie, and recent homeowner (an adventure you are sure to be a part of!) The list can go on and on, and I often describe myself as the Jill of All Trades (get it!?) I like to do a little of everything, and I always love to learn how to do new things....often by trial and error. On A Piece of the Pi, you will find lots of teaching tips, tricks, worksheets and activities from my math classroom, along with a little peek into my life outside of school. Welcome, and enjoy!